Animations

With Synthclipse you can create complex shader animations using built-in uniform variables interpolator. The interpolator blends given parameters (like a position or a color) between user specified key frames. The key frames can be added, remove or modified using two different editors (see the screenshot above):
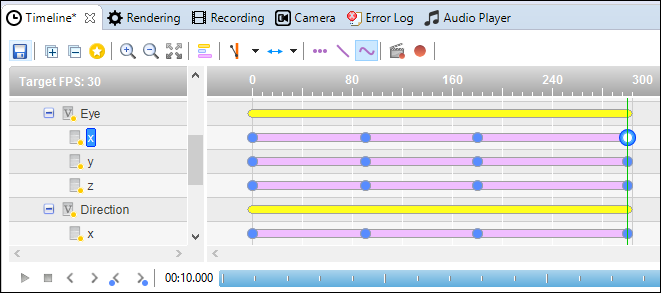
- the Timeline - a flat table showing animation intervals which key frames span. Every row of the table represents an uniform variable (if it is single valued) or one of its components (if it is vector valued [e.g. x component of a vec3 uniform])
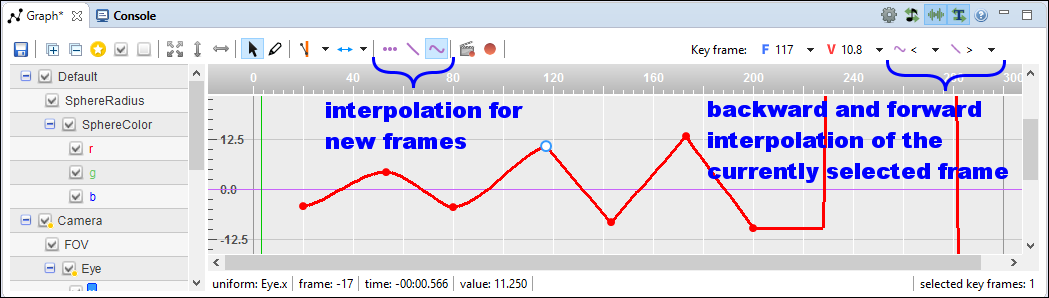
- the Graph/curve editor - an interactive plot of interpolation curves over time
In this tutorial I will describe both editors and show how to create a simple key frame animation.
1. Timeline overview
The Timeline editor is part of the Timeline View. If it is not visible on your workspace, you can activate it by choosing from the main menu: Window -> Show View -> Timeline. Below you can find description of the main parts of the Timeline:

-
Uniform variables tree - consists of a list of uniform variables and groups used in a shader. Exactly the same as can be seen in the Uniform Controls View.
-
Timeline table - is used for displaying, adding, removing and moving key frames on a virtual time line
-
Seek bar - shows and allows to change the current time of an animation
-
Seek / time header - a header that shows time axis in frame units. It is interactive - can be used as a seek bar
-
Duration and FPS settings - A button to the Time Settings Dialog where you can set FPS, duration and frame count of current animation

2. Graph/curve editor overview
The Graph/curve editor is part of the Graph View. If it is not visible on your workspace, you can activate it by choosing from the main menu: Window -> Show View -> Graph. Below you can find description of the main parts of the Graph/curve editor:

-
Uniform variables tree - consists of a list of uniform variables and groups used in a shader. Exactly the same as can be seen in the Uniform Controls View.
-
Graph area - shows key frames interpolation curves. Key frames can be easily edited by mouse dragging
-
Seek / time header - a header that shows time axis in frame units. It is interactive - can be used as a seek bar
-
Duration and FPS settings - A button to the Time Settings Dialog where you can set FPS, duration and frame count of current animation. (See the screenshot above).
3. Creating a key frame animation
The most convenient way to work with the Timeline and the Graph/curve editor is by using Synth-Anim perspective. It can be activated by choosing from the main menu: Window -> Open Perspective -> Other... -> Synth-Anim. The perspective maximizes space dedicated for the animation editors. (see the first screenshot). I highly recommend to use it during walking through this tutorial.
3.1 Getting the example

To demonstrate a key frame animation in action we will use a (slightly modified) shader from Inigo Quilez tutorial as our base: shader.stoy. Assuming you have already created a Synthclipse Project, create a new Fragx/Stoy file and paste the content of above shader.stoy file to it. Next, try to launch the shader (Shift + F12). You should see a violet ball on a checkerboard plane.


The example does not contain any key frame animation yet, but we will add few soon.
3.2 Creating a key frame animation using the Timeline
In this section we will create a simple camera animation using the Timeline. Lets start with duration and FPS settings: Open the Timeline View and go to the duration and FPS settings dialog. Here set the duration to 10 000 ms, FPS to 30 and press the OK button. Now do the following steps:
- Move the seek bar to the beginning (time 00:00:00 / key frame 0)
- Press the “Take a snapshot” button. Next, in the Take a Snapshot dialog select Eye, Direction and Up from the Camera group, and press the OK button.


3. After that few blue dots should appear in the timeline table:
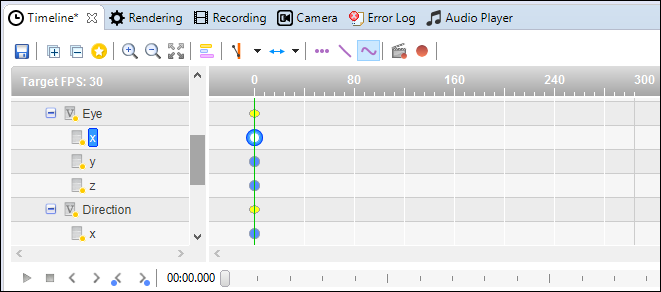
They are called the key frames. Click on one of them. In the top right corner of the Timeline a key frame edit panel will appear. You can change a key frame’s value or index in there.
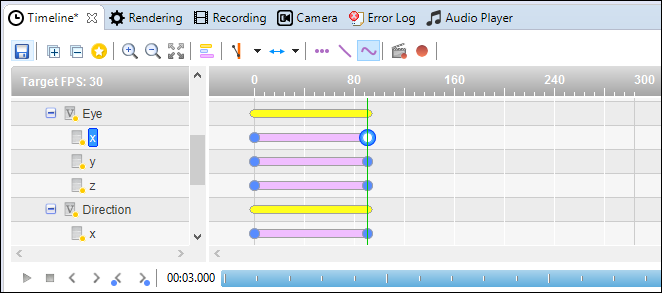
4. Lets add another set of key frames. Move the seek bar to 00:03.000 (frame 90).
5. Go to the Viewport View and move the camera somewhere (drag the mouse and move around using arrow keys).
6. Repeat step 2. Now you should have six key frames:
7. Now lets add yet another set of key frames but this time using slightly different method - Recording. Move the seek bar to 00:06.000 (frame 90).
8. Toggle on the Start recording button. From now on any change you will make to any uniform variable will be detected and recorded, though the results won’t be displayed in the timeline before you toggle the button again.

9. Move the camera somewhere (like in step 5.)
10. Toggle off the recording button (it will now have “Stop recording” label)
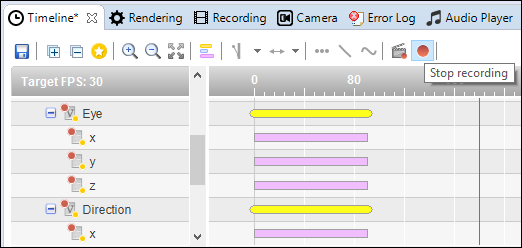
As you can see, for every changed uniform there was added a key frame to the timeline:
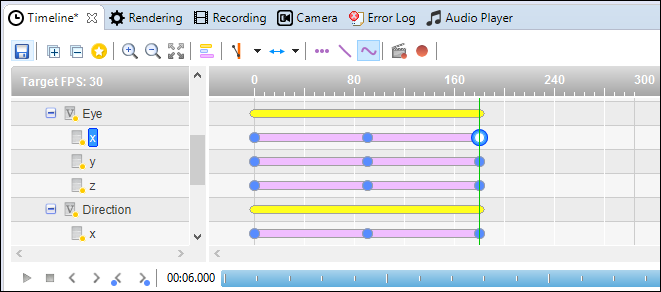
11. Now move the seek bar to the very end (00:10.000, frame 300) and add final camera key frames using technique from steps 4-5 or technique from steps 7-9, dependent on which you prefer.
12. The animation is ready. Now press the Play button and admire your first Synthclipse key frame animation :)
3.4 Interpolation methods
Synthclipse gives you choice of interpolation method that is used between the key frames. There are three possibilities:
- Catmull-Rom - one of the most popular cubic polynomial interpolation methods known as “spline interpolation”. It gives smooth curve without corners. (See Wikipedia for more details)

- Linear - piece-wise linear interpolation. Every two successive key frames are connected by a line. It could give sharp corners.

- None - also called “jump” interpolation. As the name suggests it gives sudden jumps. Current key frame value is kept until the next key frame will occur. Please note that Graph View cannot render perfectly vertical curves so it might appear like jumps are a little bit shifted/sheared but actual interpolation engine that is evaluated during the animation doesn’t produce any shifting/shearing. It is only imperfection of the Graph View.

There is possibility to mix all interpolation methods, since one can set different method for every key frame, like shown below:

3.5 Repeat mode
Synthclipse provides possibility of repeating whole sequence of key frames in a periodic manner. Such feature is called “Repeat mode” and consists of three variants:
- None - no repetition, default mode

- Repeat - once a key frame sequence finishes, just repeat it from key #0

- Ping-Pong - once a key frame sequence finishes, repeat it backward (from the last frame to the first frame), then repeat it forward (from the first frame to the last frame), then repeat backward, then forward, and so on, so on… like a ping-ping ball.

3.6 Repeat direction
Repeat direction is an option related to the Repeat mode feature. It tells Synthclipse in which time direction needs to apply the Repeat mode. The possible values are:
- Both - apply the Repeat mode before and after the key frame sequence

- Before - apply the Repeat mode before the key frame sequence

- After - apply the Repeat mode after the key frame sequence
